Nordic BLE development with SES and VS code in Ubuntu
The nRF5 series of Bluetooth low energy chip is a very popular platform from Nordic Semiconductor. Currently there are four IDEs with compiler supported by Nordic, however, for Linux users there are only two options available: SEGGER Embedded Studio (SES) and GNU/GCC.
This tutorial is aim to walk you through how to set up the develop environment with SES and Visual Studio (VS) Code in Ubuntu. The hardware used here is Nordic nRF52840 development kit.
1. Nordic nRF5 SDK
Go to Nordic website of nRF5 SDK, find the compatible version, download and unzip it (the current version is nRF5_SDK_15.3.0_59ac345). Create a new folder named nRF5 (or anything you like) under the home directory, and move the SDK folder to it. Later you may find some useful example that was built for a specific version, in that case, just download that version of SDK and move it under this nRF5 folder.
$ cd
$ mkdir nRF5
2. SEGGER Embedded Studio
SEGGER Embedded Studio (SES) is the recommended platform by Nordic. It is free for use with nRF devices and is available for Windows, Linux and OSX. There’s a very good series of YouTube videos to get you started. You can also watch the Download & First Run from SEGGER too.
Install SEGGER
Download and extract the SEGGER Embedded Studio for ARM Linux 64-bit.
sudo ./install_segger_embedded_studio
If this is the first time to run SES, you may be asked to select a license. Choose the free version and fill in the information. Click request and you will receive an email with the activation key. Select enter activation key, copy and paste the key from your email and click install license.
Install J-Link Software and Documentation Pack
The windows installer includes the J-Link software, which is not included in the Linux version. Download the .deb file and double-click to install it with Ubuntu Software.
Compile and Run
A common practice to work with Nordic BLE is to build from their example code. Thanks to all the hard coded links in their SES project settings, it’s better to keep all the relative path intact too. You can, however, create your own project folder under "<path-to-nRF5_SDK>/examples/" and copy the original example code to it so you won’t mess up the original one. Let’s assume we are already inside the examples directory, now copy ble_app_blinky to our project folder.
$ mkdir my_projects
$ cd my_projects
$ cp -r ../ble_peripheral/ble_app_blinky .
It should have a structure like this:
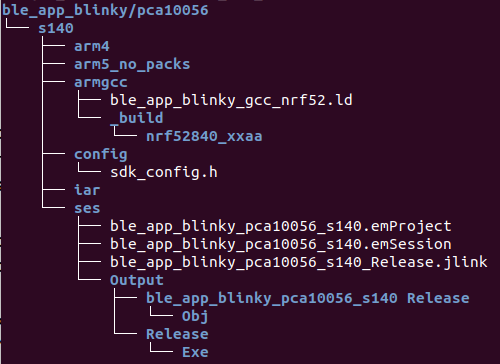
Now start SEGGER Embedded Studio, open the project file .emProject deep down the folder ble_app_blinky/pca10056/s140/ses/. Have your nRF5 dev kit plugged into the computer and swtich on power. A JLINK device should be mounted automatically. If not, check the j-Link software is correctly installed. Click Build -> Build and Run, the SES should automatically compile and download the code to the develop board. If all successful LED-1 would turn on now, and you should be able use nRF Connect to scan and see the Nordic_Blinky.
The SES is working perfectly fine, besides how can anyone complain something free? Except it’s so … ugly! The whole IDE looks so outdated that reminds you earlier 2000s. There’s no syntax highlighting, could not even collapse a code block. Yes it’s free, get the job done and a pretty good debugger too. But we want more! If you did a google search, you would find many of the desired features have been on their to-do list for years … Luckily, we can use Visual Studio Code.
3. Visual Studio Code
I used to use Atom editor, but recently switched to VS code and found it quite convenient to configure and work with.
Install VSCode
Download .deb file and double-click it to install.
Install GNU Arm Embedded Toolchain
We’ll use the toolchain to configure our settings and later to compile our project. Download the ARM GNU Toolchain. Current version is 8-2019-q3-update Linux 64-bit. Extract it to a preferred location, e.g. ~/nRF5/.
Set up Environment
Start VS code and select File -> Open Folder, navigate to the ble_app_blinky and click OK. Open up the main.c you will find many header files are missing links. Now we need to setup path for the compiler.
Configure c_cpp_properties.json
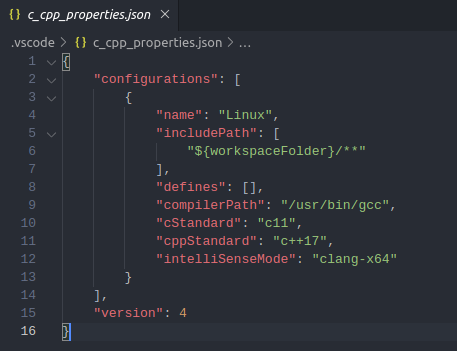
VS code uses c_cpp_properties.json to setup paths to compilers and libraries for c/c++ projects, which allows navigating files by tracing through definitions of headers, functions, constants and variables. Press CTRL+SHIFT+P, type and select C/C++: Edit Configurations (JSON). Visual Studio Code will create a c_cpp_properties.json file with the default settings inside the .vscode folder generated for your project.
Set the "compilerPath" to <path-to-arm-tool-chain>, e.g. ~/nRF5/gcc-arm-none-eabi-8-2019-q3-update/bin/arm-none-eabi-gcc'. Set the "include Path": to include all the headers from nRF SDK as well as files in your project folder.
A simple setting is shown here. Later you may want to change the list of "includePath" to include only the libraries you use by listing them individually instead of looping all with **.
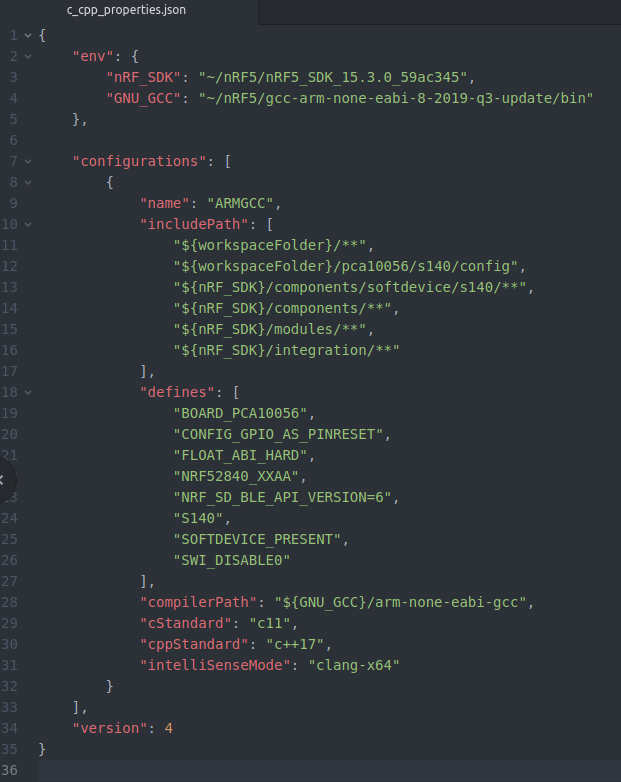
Now with the json file in place, you should be able to right-click any headers, functions, and select go to definition to find their source code. Neat!
Choose A Theme
The default Theme of VS code doesn’t do much syntax highlighting, but an huge slot of customized themes can be found via VS code extensions. I use Atom One Dark but you can choose whatever you like.
Change Font Settings
One small annoying thing you may find later if you open a new Terminal and look at the file names, is that the underscores are all rendered invisible for some reason. To fix it, open File -> Preferences -> Settings -> Text Editor -> Font -> Font Family, remove 'monospace', the one with the quotation mark.
Test with SEGGER
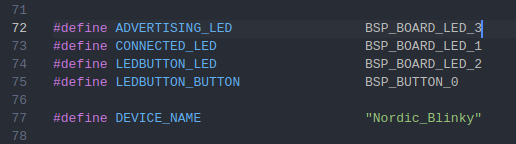
Let’s change the advertising LED number from BSP_BOARD_LED_0 to BSP_BOARD_LED_3 at line 72. Save it and switch back to SES again, make sure the line has been changed. Rebuild the project and run. The LED3 should turn on now.
If you just want use VS code as an awesome editor, you can stop here now. Next we’ll use nRF5 Command Line Tools to compile and flash the code.
Compile with GCC
Install nRF5x Command Line Tools
Download the command line tools. You can either double-click to install the .deb file or extract the .tar file to anywhere you want but don’t forget to add directory to the $PATH, e.g., add the following lines at the end of your .bashrc file:
# NRF52 Command Line Tools
export PATH="<path to nrf_command_line_tools>/mergehex:$PATH"
export PATH="<path to nrf_command_line_tools>/nrfjprog:$PATH"
Verify the tools have been installed properly:
$ nrfjprog -v
nrfjprog version: 10.3.0
JLinkARM.dll version: 6.48b
Configuring Your Toolchain
Inside your <nRF5_SDK>/components/toolchain/gcc/ open Makefile.posix (for Linux user), change the value of GNU_INSTALL_ROOT to match the <ARM GNU Tool>/bin/ directory, e.g. the path to gcc-arm-none-eabi-8-2019-q3-update.
GNU_INSTALL_ROOT ?= <path-to-gcc-arm-none-eabi-8-2019-q3-update>/bin/
GNU_VERSION ?= 8.3.1
GNU_PREFIX ?= arm-none-eabi
The GNU_VERSION can be found by typing the following command inside your <GNU_INSTALL_ROOT> directory.
$ ./arm-none-eabi-gcc --version
arm-none-eabi-gcc (GNU Tools for Arm Embedded Processors 8-2019-q3-update) 8.3.1 20190703 (release) [gcc-8-branch revision 273027]
Copyright (C) 2018 Free Software Foundation, Inc.
This is free software; see the source for copying conditions.  There is NO
warranty; not even for MERCHANTABILITY or FITNESS FOR A PARTICULAR PURPOSE.
Compile and Run
Now let’s change back the advertising LED from BSP_BOARD_LED_3 to BSP_BOARD_LED_0, build and run the ble_app_blinky again.
Build application
To build from VS code, start a new terminal by selecting Terminal -> New Terminal. Now you are inside the ble_app_blinky folder
$ cd pca10056/s140/armgcc/
$ make
Flash with Serial Wire Debug (SWD)
Nordic BLE application requires their proprietary SoftDevices, so let’s flash the SoftDevice first.
$ make flash_softdevice
Now flash the application
$ make flash
Of course, you can combine the two commands:
make flash_softdevice && make flash
Generally, you only need to flash the SoftDevice once for the first time and flash your own application thereafter whenever you want. However, for some reason, occasionally I have to run make flash first before make flash_softdevice.
If no error occurred, we should now see the advertising LED of the nRF52840 dev board changed from LED4 back to LED1 again. Congratulations!
Further readings
If you want to use the Nordic SDK but with a different board not from Nordic, you can follow this tutorial at SparkFun on how to setup their SparkFun Pro nRF52840 Mini.