Nordic BLE Device Firmware Update Bootloader
Noric provides detailed documentations of Bootloader and DFU modules
1. Secure Device Firmware Update
Nordic has a nice step-by-step guide. A more detailed introduction can also be found at Novelbits.
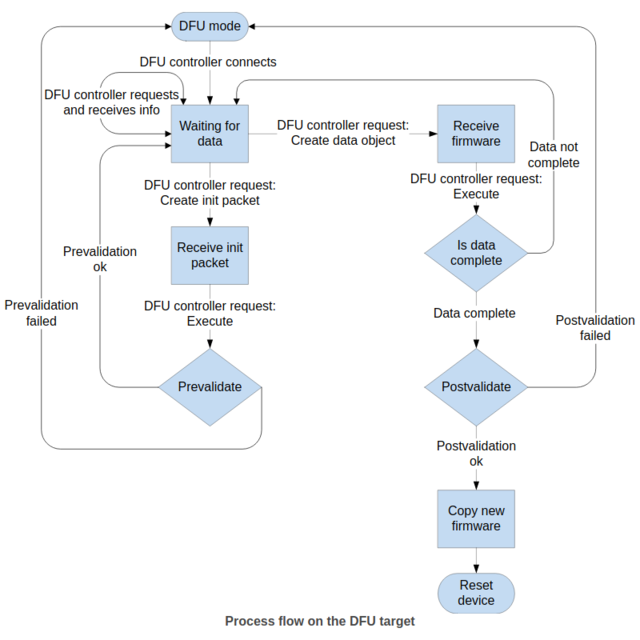
This digram shows DFU process workflow.
To implement DFU, You will need python 3 and pip to install nrftuil command-line tool. If you want you can setup a virtual environment as you normally would with python project, and install nrfutil inside the venv. an You’ll also need GCC compiler toolchain for ARM, you can follow the previous guide. Verify installation with: nrfutil version
Use nrfutil --help to find all the commands, more about nRF Util can be found here.
I’ll be using nRF52840 with SDK 15.3.0 and SoftDevice s140 version 6.1.1
1.1. Generate Keys:
nrfutil keys generate private.key
This generate a private key, with which you can generate your public key for use with bootloader.
nrfutil keys display --key pk --format code private.key --out_file public_key.c
1.2. Build the Bootloader
To perform the secure boot, the first step is to download and compile the micro-ECC library,
cd <nRF5 SDK>/externa/micro-ecc
git clone https://github.com/kmackay/micro-ecc.git
cd nrf52hf_armgcc/armgcc
make
Note the hf is for CPU that has FPU, while nf for those without.
Nordic Provides secure bootloaders under <nRF5 SDK>/examples/dfu/secure_bootloader/. Copy it to your own, <nRF5 SDK>/examples/myprojects/Secure_bootloader/. Now copy the public_key.c to the folder so it stays at the level as main.c. Find the dfu_public_key in the .emProject file you will be using, and replace it with the public_key like below:
......
<folder Name="Application">
  <file file_name="../../public_key.c" />
  <file file_name="../../main.c" />
  <file file_name="../config/sdk_config.h" />
</folder>
......
Note that you could just overwrite the dfu_public_key.c with the public_key.c instead.
Build the secure bootloader like any other application with SES.
1.3. Flash the Bootloader
First, clear everything on the chip, either through SES “Target” => “Connect J-Link” and then “Erase All”, or use nrfjprog:
nrfjprog -f NRF52 --eraseall
Next, flash bootloader and softdevice with SES, “Target” => “Download xxx”. Verify the bootloader is advertising “DFUTarg”.
2. Over the Air (OTA) DFU
With the target device ready for firmware update, we will now be working on the firmware package itself.
2.1. Create DFU zip packet
Build an application, e.g., ble_app_blinky, copy the output .hex file to where the private key located, and use nrfutil to generate the .zip file.
nrfutil pkg generate --hw-version 52 --application-version 1 --application ble_app_blinky_pca10056_s140.hex --sd-req 0xB6 --sd-id 0xB6 --key-file private.key app_dfu_package.zip
A few notes here:
-
Use
generateto create zip file anddisplayto show information of the generated zip file. -
Application version: there are two options here:
--application-versionis an integer, defualt is 0.--application-version-stringis a quoted string in the format of “xx.xx.xx”.nrfutilwill convert this string to an integer by simply removing the “." between them, e.g., “1.0.0” converts to ten thousand 1 00 00.
The new version has to be equal or greater than the one it replaces, e.g., “1.0.0” is much larger than 100. more information of Acceptance rules for versions can be found here. In case both option are presented, only the string version is used.
-
--sd-req: the SoftDevice firmware ID required for the DFU, this is one on the target device. For s140 version 6.1.1 it is 0xB6, and for s140 version 7.0.1 it is 0xCA .You can find which version you are using in /components/softdevice/s140/hex”. Typenrfutil pkg generate --helpto find corresponding byte code. -
--sd-id: the new SoftDevice ID if a SoftDevice is included in the zip file, and will be the new--sd-reqfor next DFU. -
--key-file: is the private key generated previously.
Find out all the options with nrfutil pkg generate --help
2.2. Performing OTA DFU
Copy the generated zip file to the phone or a PC, open nRF Connect App, i.e. nrfconnect341x8664 for Linux, and connect to DfuTarg. For mobile app, switch the page all the way to the right, the last one is DFU, click Open Document Picker to navigate to the zip file location, and click Start button. For the pc version, there’s an extra DFU button besides the Peripheral. Click it, then select the zip file and start DFU process. Once the process is completed, the new application should begin advertising.
Button Triggered DFU
2.3. Buttonless OTA DFU
Up to this point, if you want perform OTA DFU, you will have to set the board to the DFU mode by holding Button_3 on the dev kit while powering up. Obviously this is not the preferred behavior.
Nordic provides the DFU Buttonless example under \examples\ble_peripheral\ble_app_buttonless_dfu, you can also follow this github tutorial of nRF52832.
First build the application and then create the package as in section 2.1. Perform the OTA DFU, once complete, you can now start a new OTA DFU without the need to hold the button to boot into DFU mode. The guide has a detailed section of explanation.
3. Merge All in One Flash
There are times when you don’t want to do a bootloader first and then DFU, e.g. in production, you may want have all components: bootloader, SoftDevice and application combined together in a single DFU flash, and get the application running right after reboot. In order to do that, we need make sure the bootloader knows the application is in the memory or it will boot into DFU mode instead. This can be achieved by generating bootloader settings and merge together with other components, e.g., bootloader-softdevice-application-settings.
3.1. Settings Page
For Generating and displaying bootloader settings, run the following command
nrfutil settings generate --family NRF52840 --application my_app.hex --application-version 0 --bootloader-version 0 --bl-settings-version 2 my_settings.hex
--family: NRF52840 if you are using nRF52840 or NRF52 for nRF52832/nRF52833--bl-settings-version: 2 for SDK version 15.3.0 or later--application: the application hex file
Use nrfutil settings display my_app_settings.hex check the contents of the generated HEX file. For more inforamtion use nrfutil settings generate --help.
3.2. Merge Hex into One
Use mergehex to merge two hex files that can be any combinations of bootloader, SoftDevice, application, setting, and their combined hex files. E.g.
mergehex -m bootloader.hex s140_6.1.1_softdevice.hex -o sd_bootloader.hex
mergehex -m my_app.hex my_settings.hex -o my_app_settings.hex
mergehex -m my_app_settings.hex sd_bootloader.hex -o my_app_settings_sd_bootloader.hex
3.3. Flash the Firmware
Use nrfjprog to flash the hex file to the chip. Remember update the nrfjprog to the newest version, or you may face unexpected issue .
nrfjprog -f NRF52 --program sd_s140_bootloader_buttonless_with_setting_page_dfu_secure_ble_debug_without_bonds.hex --chiperase -r
--chiperase: erase all user available memory, inlcuding UICR-r: reset the device after the flash DFU
4. Debugging Application with Bootloader in Place
In this guide for nRF52832 there’s a section describe debugging application firmware with the booloader in place. The same rule applies to the nRF52840. Here are the steps I use to debug with SES:
Step 1 Download the Bootloader
Flash the bootloader/SoftDevice using either SES or nrfjprog
Step 2 Create Settings Page
We’ll need to make sure the bootloader knows there’s an application, so create the settings page as in Section 3.1.
Step 3 Flash the Application and Settings Page
Again, you can either flash with nrfjprog or SES. To use SES, you need to change the settings in Projections => Options => Common => Debug => Loader, in Additional Load Files[1], set the path to the Settings page HEX file.
If you are using SDK 15.3.0, you need to remove SoftDevice from the Additional Load Files[0], since the SES will erase bootloader start address when downloading the SoftDevice. For SDK 16.0.0 and later, this bug has been resolved. You instead directly modify the .emProject file as follows:
debug_additional_load_file="../../../../../../components/softdevice/s140/hex/s140_nrf52_7.0.1_softdevice.hex"
debug_additional_load_file1="/home/lei/opt/nRF5/Python/DFU/SDK16.0_S140_7.0.1/settings_nus_dfu.hex"
You only need to make the changes once for each project.
Now click Build and Debug, just make sure you are in Debug mode,
Step 4 Debug
After the application and settings successfully flashed, the debugger should be running now. Next time you can just click Debug => Go. If you need to rebuild the application, you’ll have to do step 2 to again.
Remember to to enable NRF_LOG_BACKEND_RTT_ENABLED, disable NRF_LOG_BACKEND_UART_ENABLED and NRF_FPRINTF_FLAG_AUTOMATIC_CR_ON_LF_ENABLED.
Issue with adding hex file in the SES Debugger
I have had problems that using SES to loader Settings.hex file somehow failed to pass checksum causing board stuck in DFU mode. The workaround is to specify the output application .elf and .hex file in Debugger->Debug Symbols Files and Loader->Load File setting respectively.
5. Dual-Bank and Single-Bank Updates
If NRF_DFU_SINGLE_BANK_APP_UPDATES is set, then single-bank update is preferred. Otherwise, all firmware updates are performed as dual-bank updates. I have problem here!